VPN Server Recipe for AWS (Ubuntu 16.04 / 18.04)
• • ☕️ 7 min read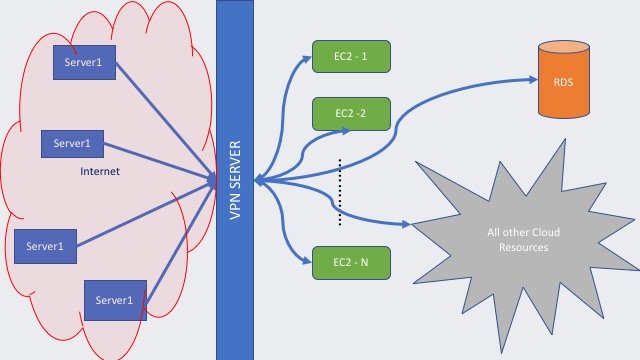
VPN Server
Virtual Private Network (VPN), provides online privacy and sort of a protection by creating a private network. However, setting up a VPN can get complicated pretty fast and makes you feel like dealing with unnecessary details of Dev-Ops kind of work. So to keep my previous VPN work saved somewhere, I just put together a VPN recipe to come back and visit when I need another one.
If you do not want to deal with setting up one, there are also bunch of alternatives in every cloud provider. Usually they charge per user, per client basis, or
they charge Software as a service per hour. In addition, some of them started as free service on cloud providers then they changed to subscription based
service, but I usually prefer a free software as service, although it takes me little longer to setup, at the end I can have full control, and the price tag is lower.
WHY would you need one?
Well every company, every entity, every system somewhat encapsulates their network and resources to prevent unwanted access from outside world aka. Public Internet/Web and
when you work from your local computer to access remote resources you usually need to setup a client (Cisco, OpenVPN, etc.). These clients uses a protocol to communicate with
a VPN-Server or/and Firewall to grant access the resources behind them and once you connect you can act like you are in their network.
What to Use
As I mentioned above besides the “paid” VPN services you can setup a physical/software VPN server yourself.
In this recipe it is shown how to setup a openVpn aka ocserv on AWS along with AdDirectory.
Ingredients:
- 1 small EC2 Machine, or piece of cluster on AWS (that you know it will be up all the time to grant access)
- Route53 entry, if you have a public domain you can create 1 entry ex:
vpn.mydomain.com - Ad Directory setup (I used the simple ad service, although you can choose that fits you best Microsoft etc.)
- ocserv
- simple certificate (issued by let’s encrypt)
- elastic IP to assign to the server (be careful non-assigned elastic IP costs $)
NOTE: you can spin up multiple vpn servers pointing the same domain vpn.mydomain.com, with DNS load-balancing if one of them goes down
so other one can takeover, and if you have many users (20–100) DNS Lb would be enough to handle users’ traffic.
Step-1, Spin up an Ubuntu Server (16.04, 18.04)
sudo apt-get update
sudo apt-get install ocserv
sudo add-apt-repository ppa:certbot/certbot
sudo apt-get update
sudo apt-get install certbot
sudo apt-get install python-certbot-nginx
sudo apt-get install nginx
- need to update and install some repos on the machine, including an openvpn server (ocserv) that is compatible with CiscoAnyConnect or OpenConnect using ipsec/ikev2
- need to install certbot, basically to issue a openssl certificate for the server
- need to install nginx, I’ll just start a simple nginx webserver, so over
vpn.mydomain.comI can issue my openssl certificate through Let’s Encrypt https://letsencrypt.org/
Here need to setup nginx server, but before this I need to make sure all the incoming / outgoing rules set in my machine (HTTPS 8080, HTTP 80, TCP, SSH etc.) you can do this by changing/updating security group, and do not forget to assign a Public IP for server so we can bind our reserved elastic IP this machine.
Some nginx settings:
cd /etc/nginx/sites-enabled
sudo ln -s ../sites-available/myOpenVpn .
sudo systemctl status nginx
sudo systemctl stop nginx
cd /etc/letsencrypt/
cd /etc/nginx/sites-enabled
sudo rm default
Update /etc/nginx/sites-enabled/myOpenVpn that has the direction for nginx
##### myOpenVpn #####
server {
    listen 80 default_server;
    listen [::]:80 default_server ipv6only=on;

    server_name vpn.mydomain.com;
    root /var/www/vpn.mydomain.com;

    index index.html;
    location / {
        try_files $uri $uri/ =404;
    }
}

# Restart
sudo systemctl restart nginx
sudo chown www-data:www-data /var/www/vpn.mydomain.com -R
sudo certbot certonly --webroot --agree-tos --email youremail@provider.com -d vpn.mydomain.com -w /var/www/vpn.mydomain.com

# that will ask you some questions just answer yes / no as you find best answer
This should generate the certificates check with ls/ll where they are generated, hence we will need them to restart ocserv.
Step-2 Ocserv Setup
Update ocserv configuration
# server-cert = /etc/ssl/certs/ssl-cert-snakeoil.pem
# server-key = /etc/ssl/private/ssl-cert-snakeoil.key
server-cert = /etc/letsencrypt/live/vpn.mydomain.com/cert.pem
server-key = /etc/letsencrypt/live/vpn.mydomain.com/privkey.pem
default-domain = mydomain.com
ipv4-network = 10.10.10.0
ipv4-netmask = 255.255.255.0
route = AAA.BBB.0.0/255.255.0.0 # AAA.BBB your server's network class
route = 192.168.0.0/255.255.0.0
Here we set some parameters, commented out default certificates snakeoil etc. and added freshly generated certs. At this point you decrease the server exposure to outside/web by stopping nginx and changing the ports/access rules. I do not need webserver running anymore, since I generated the necessary certificates(.pem files). To learn more about certificates you can search for OpenSSL, TLS Certificate etc. they are basically used to add encryption.
Setting Up Active Directory (Simple Active Directory AWS)
In AWS you need to setup a Active Directory, that will take couple minutes to finish up. After Active Directory setup take the password for admin user Usually it is Administrator and Password. You can change this password too. You can name active directory something like mydomain.com etc.
Need to install some packages to manage our AWS AD Directory service. almighty sudo call:
sudo apt-get install sssd realmd krb5-user packagekit adcli ldb-tools ldap-utils
Update SSSD Service so ocserv can utilize the service
EDIT : /etc/sssd/sssd.conf IMPORTANT: krb5_realm all should be UPPERCASE, I do not know why =)
[sssd]
domains = mydomain.com
config_file_version = 2
services = nss, pam, ssh, sudo

[sudo]
debug_level = 5

[domain/mydomain.com]
ad_domain = mydomain.com
krb5_realm = MYDOMAIN.COM
realmd_tags = manages-system joined-with-adcli
cache_credentials = True
id_provider = ad
krb5_store_password_if_offline = True
default_shell = /bin/bash
ldap_sasl_authid = COMPUTER_NAME$
ldap_id_mapping = True
fallback_homedir = /home/%u
access_provider = ad
ldap_user_ssh_public_key = sshPublicKey
debug_level = 5
EDIT: /etc/krb.5.conf Realm —-> Active Directory DNS name.
# Default Realm (AKA Active Directory)
    default_realm = ADMYDOMAIN.COM

# The following krb5.conf variables are only for MIT Kerberos.
    krb4_config = /etc/krb.conf
    krb4_realms = /etc/krb.realms
    kdc_timesync = 1
    ccache_type = 4
    forwardable = true
    proxiable = true

# The following libdefaults parameters are only for Heimdal Kerberos.
    v4_instance_resolve = false
    v4_name_convert = {
        host = {
            rcmd = host
            ftp = ftp
        }
        plain = {
            something = something-else
        }
    }
    fcc-mit-ticketflags = true

# Add/ Edit Realms
[realms]
    ADMYDOMAIN.COM = {
        kdc = ActiveDirectoryIPAdress1,ActiveDirectoryIPAddress2
        admin_server = mydomain.com
    }
    ATHENA.MIT.EDU = {
        kdc = kerberos.mit.edu:88
        kdc = kerberos-1.mit.edu:88
        kdc = kerberos-2.mit.edu:88
        admin_server = kerberos.mit.edu
        default_domain = mit.edu
    }
    MEDIA-LAB.MIT.EDU = {
        kdc = kerberos.media.mit.edu
        admin_server = kerberos.media.mit.edu
    }
    .....

[login]
    krb4_convert = true
    krb4_get_tickets = false
Note: kdc entry must be your active directory IP addresses
RESTART Everything & JOIN Active Directory LDAP
sudo systemctl sshd
sudo systemctl restart ocserv
sudo adcli join --verbose --domain mydomain.com --domain-realm MYDOMAIN.COM --domain-controller 111.222.33.44 --computer-name COMPUTER_NAME --login-type user --login-user Administrator@MYDOMAIN.COM
That will prompt a password that I saved above, almost all my passwords are Admin12345, jokes aside put something better and save it somewhere.
sudo systemctl restart sssd

# change dhcp options set in AWS, with nameservers and ad directory
sudo dhclient -r; sudo dhclient
Step-3 for SSH
If you want every user in Active Directory to access resources through SSH, we need to change some pam configuration /etc/pam.d/common-account
Something similar to this:
# here are the per-package modules (the "Primary" block)
account [success=1 new_authtok_reqd=done default=ignore]        pam_unix.so
# here's the fallback if no module succeeds
account requisite                       pam_deny.so
# prime the stack with a positive return value if there isn't one already;
# this avoids us returning an error just because nothing sets a success code
# since the modules above will each just jump around
account required                        pam_permit.so
# and here are more per-package modules (the "Additional" block)
account sufficient                      pam_localuser.so
account sufficient                      pam_sss.so
# account       [default=bad success=ok user_unknown=ignore]    pam_sss.so
# end of pam-auth-update config
session    required    pam_mkhomedir.so skel=/etc/skel/ umask=0022
- Now you can ADD/EDIT users to Active Directory (that is another story but short and easy one)
- So each Active Directory User can have access to resources through VPN.
- To use VPN server on your local machine you either need Cisco-AnyConnect or OpenConnect, that are compatible with ocserv.
- For more information you can check this page: https://ocserv.gitlab.io/www/manual.html
Conclusion
VPN Server Recipe is just a page to remind me if I need to setup one. Some steps above might not work at first but changing couple configurations and
restarting services on machine helps everything (Some Dev-Ops stuff).
You can also issue A+ Certificate Issued through HTTPS 8080 port on nginx.